If a certain piece of code is no longer relevant or needed, or if it’s no longer maintained, you can mark it as obsolete.
Use the [Obsolete] tag to mark the code. You can mark a function:
[Obsolete("Use GetAsync<T>(string url) instead")]
public async Task<T?> GetAsync<T>(string url, string parameters)
{
  var client = _httpClientFactory.CreateClient("HttpClient");
  var response = await client.GetAsync(url + parameters);
  if (!response.IsSuccessStatusCode)
    throw new Exception($"{response.StatusCode}: {response.ReasonPhrase}");
  var responseJson = await response.Content.ReadFromJsonAsync<T>();;
  return responseJson;
}
Or you can mark a class:
namespace CatFacts
{
  [Obsolete("The code no longer supports weather forecasts")]
  public class WeatherForecast
  {
    public DateTime Date { get; set; }

    public int TemperatureC { get; set; }

    public int TemperatureF => 32 + (int)(TemperatureC / 0.5556);

    public string? Summary { get; set; }
  }
}
When the code is marked as [Obsolete], you will receive a warning when calling the function or referencing the class:
Calling code marked with [Obsolete] will give a warning.
You can also return an error if the code is called. Include a true Boolean in the attribute:
[Obsolete("Use GetAsync<T>(string url) instead", true)]
public async Task<T?> GetAsync<T>(string url, string parameters)
{
  var client = _httpClientFactory.CreateClient("HttpClient");
  var response = await client.GetAsync(url + parameters);
  if (!response.IsSuccessStatusCode)
    throw new Exception($"{response.StatusCode}: {response.ReasonPhrase}");
  var responseJson = await response.Content.ReadFromJsonAsync<T>();;
  return responseJson;
}
The compiler will now throw an error:
[Obsolete(“”, true)] will return an error when called
SO WHAT IS THE DIFFERENCE BETWEEN DEPRECIATED, DEPRECATED AND OBSOLETE CODE?
Depreciated and Deprecated are the same thing. Technically, we don’t depreciate code, we deprecate it.
Deprecated code is code that currently is supported, but in the future will be removed. It’s the way you ease you out of functionality that you wish to remove. But at the same time give users of your code time to adapt and find a new solution – preferably use a new method or class that you include at the same time the old code is deprecated.
Obsolete code is code that is no longer supported, or is irrelevant. Calling obsolete code is at your own risk as the result is deemed undefined. Usually this means that a feature have been removed from your codebase, but the call is still there to allow existing code to compile.
WHAT IF I MESS UP THE 2 TERMS?
Don’t worry, even Microsoft have mixed the terms. Look at the example above. The attribute is called [Obsolete], but the compiler warning say “Deprecated“.
As long as you supply a good description along with the [Obsolete] attribute, everything will be fine.
The Game Of Life is a cell life simulator devised by the Cambridge mathematician John Conway.
Game Of Life in a Console Application
The simulator serves as an excellent coding example to learn new programming languages. The rules are simple. You have a grid in a predetermined size, each cell can live or die based on a set of rules:
If a cell is alive, and there are 0 or 1 living neighbors, the cell dies of loneliness.
If a cell is alive, and there are 2 or 3 living neighbors, the cell survives.
If a cell is alive, and there are 4 or more living neighbors, the cell dies of overpopulation.
If a cell is dead, and there are 3 living neighbors, the cell comes alive.
This is an example of a simple game of life implementation in C# and .net 8. The simulation uses the console output to visualize the game progress.
UPDATE: Code have been updated to recalculate the complete board before progressing. Thanks to Alexander Gats for that one!
STEP 1: DEFINE THE GRID SIZE AND PRE-SEED A NUMBER OF CELLS
const int BOARD_WIDTH = 80;
const int BOARD_LENGTH = 25;
const int ACTIVE_CELLS_AT_START = 400;

bool[,] board = new bool[BOARD_WIDTH, BOARD_LENGTH];
var random = new Random();

// Populate a number of cells to begin with
for (int i = 0; i < ACTIVE_CELLS_AT_START; i++)
{
  board[random.Next(board.GetLength(0)), random.Next(board.GetLength(1))] = true;
}
First we define the game prerequisites; the size of the grid (called board) and how many cells should be alive when the simulation starts.
Then we populate the grid by randomly setting cells in the grid to true (true meaning alive, false meaning dead).
STEP 2: MAKE AN ALGORITHM TO CALCULATE THE NUMBER OF LIVING NEIGHBORS
int CountNeighbors(bool[,] board, int x, int y)
{
  int ac = 0;
  // Double loop from 1 up and 1 left to 1 down and 1 right
  // Gives 9 iterations
  for (int i = x - 1; i <= x + 1; i++)
  {
    for (int j = y - 1; j <= y + 1; j++)
    {
      // Only count cells within the board (IsValidIndex)
      // and do not count the cell itself (IsYourself)
      if (IsValidIndex(i, j, board.GetLength(0), board.GetLength(1))
          && !IsYourself(x, y, i, j)
          && board[i, j])
        ac++;
    }
  }

  return ac;
}

bool IsValidIndex(int i, int j, int rows, int cols)
{
  return i >= 0 && i < rows && j >= 0 && j < cols;
}

bool IsYourself(int x, int y, int i, int j)
{
  return x == i && y == j;
}
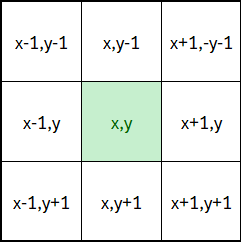
The CountNeighBors takes the game grid and the x/y position of the cell to calculate how many of the 8 neighboring cells are alive.
The white cells are the cells to check
The algorithm needs a double loop to check the neighbors.
But it also needs to be smart enough to count even if the cell is on the edge of the grid. The IsValidIndex checks to see if the cell being investigated is within the board.
Also, we should not count the cell being investigated. The IsYourself checks to see if the cell being investigated is the current cell, disregard that cell.
STEP 3: CALCULATE THE CELL LIFE
bool CalculateCellLife(bool[,] board, int x, int y)
{
  int neighbors = CountNeighbors(board, x, y);
  // If cell is alive:
  if (board[x, y] == true)
  {
    // 0 or 1 neighbors: Die of loneliness
    if (neighbors <= 1)
      return false;
    // 4 or more neighbors: Die of overpopulation
    if (neighbors >= 4)
      return false;
    return true;
  }
  // If cell is not alive:
  else
  {
    // 3 neighbors give birth to a new cell
    if (neighbors == 3)
      return true;
    return false;
  }
}
This is the actual game of life algorithm.
The method uses the CountNeighbors function to calculate the number of alive cells surrounding a specified cell, and return true if cell is alive and false if cell is dead.
As stated before, the rules are that a living cell will die if there are 0,1 or more than 4 alive surrounding cells, and come alive if there is precisely 3 living cells surrounding it.
STEP 4: MAKE A FUNCTION TO PROGRESS THE SIMULATION BY ONE STEP
bool[,] StepSimulation(bool[,] currentBoard)
{
  // Recalculate a new board based on the values
  // of the current board
  bool[,] newBoard = new bool[BOARD_WIDTH, BOARD_LENGTH];
  for (int x = 0; x < board.GetLength(0); x++)
  {
    for (int y = 0; y < board.GetLength(1); y++)
    {
      newBoard[x,y] = CalculateCellLife(currentBoard, x, y);
    }
  }
  return newBoard;
}
Here we calculate the next step in the simulation by creating a new board based on the values of the old board.
STEP 5: DRAW A CELL IN THE CONSOLE
void DrawCell(int x, int y, bool isAlive)
{
  Console.SetCursorPosition(x, y);
  if (!isAlive)
    Console.BackgroundColor = ConsoleColor.Black;
  else
    Console.BackgroundColor = ConsoleColor.White;
  Console.Write(" ");
}
To draw a cell in the console I simply move the cursor to the determined position and draws a space with either black (dead) or white (alive) background.
STEP 6: THE MAIN GAME LOOP
while (true)
{
  // Progress the simulation
  board = StepSimulation(board);
  // Draw the new board
  for (int x = 0; x < board.GetLength(0); x++)
  {
    for (int y = 0; y < board.GetLength(1); y++)
    {
      DrawCell(x, y, board[x, y]);
    }
  }
}
This is the main game loop that loops forever, takes each cell on the board, calculates if the cell must live or die, and draws the result to screen.
COMPLETE CODE:
This is the code in its completion:
const int BOARD_WIDTH = 80;
const int BOARD_LENGTH = 25;
const int ACTIVE_CELLS_AT_START = 400;

bool[,] board = new bool[BOARD_WIDTH, BOARD_LENGTH];
var random = new Random();

// Populate a number of cells to begin with
for (int i = 0; i < ACTIVE_CELLS_AT_START; i++)
{
  board[random.Next(board.GetLength(0)), random.Next(board.GetLength(1))] = true;
}

while (true)
{
  // Progress the simulation
  board = StepSimulation(board);
  // Draw the new board
  for (int x = 0; x < board.GetLength(0); x++)
  {
    for (int y = 0; y < board.GetLength(1); y++)
    {
      DrawCell(x, y, board[x, y]);
    }
  }
}

bool[,] StepSimulation(bool[,] currentBoard)
{
  // Recalculate a new board based on the values
  // of the current board
  bool[,] newBoard = new bool[BOARD_WIDTH, BOARD_LENGTH];
  for (int x = 0; x < board.GetLength(0); x++)
  {
    for (int y = 0; y < board.GetLength(1); y++)
    {
      newBoard[x,y] = CalculateCellLife(currentBoard, x, y);
    }
  }
  return newBoard;
}

bool CalculateCellLife(bool[,] board, int x, int y)
{
  int neighbors = CountNeighbors(board, x, y);
  // If cell is alive:
  if (board[x, y] == true)
  {
    // 0 or 1 neighbors: Die of loneliness
    if (neighbors <= 1)
      return false;
    // 4 or more neighbors: Die of overpopulation
    if (neighbors >= 4)
      return false;
    return true;
  }
  // If cell is not alive:
  else
  {
    // 3 neighbors give birth to a new cell
    if (neighbors == 3)
      return true;
    return false;
  }
}

int CountNeighbors(bool[,] board, int x, int y)
{
  int ac = 0;
  // Double loop from 1 up and 1 left to 1 down and 1 right
  // Gives 9 iterations
  for (int i = x - 1; i <= x + 1; i++)
  {
    for (int j = y - 1; j <= y + 1; j++)
    {
      // Only count cells within the board (IsValidIndex)
      // and do not count the cell itself (IsYourself)
      if (IsValidIndex(i, j, board.GetLength(0), board.GetLength(1))
          && !IsYourself(x, y, i, j)
          && board[i, j])
        ac++;
    }
  }

  return ac;
}

bool IsValidIndex(int i, int j, int rows, int cols)
{
  return i >= 0 && i < rows && j >= 0 && j < cols;
}

bool IsYourself(int x, int y, int i, int j)
{
  return x == i && y == j;
}

void DrawCell(int x, int y, bool isAlive)
{
  Console.SetCursorPosition(x, y);
  if (!isAlive)
    Console.BackgroundColor = ConsoleColor.Black;
  else
    Console.BackgroundColor = ConsoleColor.White;
  Console.Write(" ");
}
This is more of a design pattern than it is a requirement. I use this technique when my application grows in size. When my application needs to connect to 2 or more databases, I use this encapsulation method to allow me to name my database connections before using them.
STEP 1: ADD 2 CONNECTION STRINGS TO THE appsettings.config
STEP 2: MAKE 2 ALMOST IDENTICAL CLASSES, ONE FOR EACH CONNECTION STRING
The basic “DataContext” class looks like this:
using Microsoft.Data.SqlClient;
using Microsoft.Extensions.Configuration;

namespace MyCode
{
    public class SourceDataContext
    {
        private readonly string _connectionString;

        public SourceDataContext(IConfiguration configuration)
        {
            _connectionString = configuration.GetConnectionString("Source");
        }

        public IDbConnection CreateConnection() => new SqlConnection(_connectionString);
    }
}

namespace MyCode
{
    public class DestinationDataContext
    {
        private readonly string _connectionString;

        public DestinationDataContext(IConfiguration configuration)
        {
            _connectionString = configuration.GetConnectionString("Destination");
        }

        public IDbConnection CreateConnection() => new SqlConnection(_connectionString);
    }
}
The only difference is the connection string name. These names are only as demonstration, although they could work in a production environment. Names like “ConsumerDatacontext” or “ProductsDatacontext” are probably more common.
STEP 3: ADD THE DataContext CLASSES IN THE Program.cs
Now I have some good names for my database connections. The connection string is hidden, and can now be changed without having to rename multiple code files. And I can add things like Azure Managed Identity to one or more connections without interfering with calling code.
STEP 4: USE THE CLASSES IN YOUR REPOSITORIES:
This piece of pseudocode is using Dapper to select from a table. What you should be focusing on is line 17, where I create the database connection.
using Dapper;
using Microsoft.Data.SqlClient;

namespace MyCode
{
    public class MyRepository
    {
        private readonly SourceDataContext _dataContext;

        public AdvertBrandRepository(SourceDataContext dataContext)
        {
            _destinationDataContext = destinationDataContext;
        }

        public async Task<IEnumerable<MyData>> GetAll()
        {
            using var connection = _sourceDataContext.CreateConnection();
            mydata = await connection.QueryAsync<MyData>($"SELECT * from MyTable");
            return mydata;
        }
    }
}
WHAT OTHER SHENANIGANS CAN YOÚ DO WHEN YOU HAVE A Datacontext class?
You can have the connection string og one database controlled by Azure Managed Identity, and another not.
You can add all available table names to the Datacontext:
namespace MyCode
{
    public class SourceDataContext
    {
        private readonly string _connectionString;

        public SourceDataContext(IConfiguration configuration)
        {
            _connectionString = configuration.GetConnectionString("Source");
        }

        public SqlConnection CreateConnection() => new SqlConnection(_connectionString);

        public string TableName1 = "TableName1";
        public string TableName2 = "TableName2";

    }
}

// Then use the table names in the code:

using Dapper;
using Microsoft.Data.SqlClient;

namespace MyCode
{
    public class MyRepository
    {
        ...
        ...

        public async Task<IEnumerable<MyData>> GetAll()
        {
            using var connection = _sourceDataContext.CreateConnection();
            mydata = await connection.QueryAsync<MyData>($"SELECT * from {_sourceDataContext.TableName1}");
            return mydata;
        }
    }
}
Or you can have an “IsEnabled” to allow yourself to do DryRuns:
namespace MyCode
{
    public class SourceDataContext
    {
        private readonly string _connectionString;

        public SourceDataContext(IConfiguration configuration)
        {
            _connectionString = configuration.GetConnectionString("Source");
            // In this example, there is a setting called "SourceEnabled" in the config file
            Enabled = _configuration.Get<bool>("SourceEnabled");
        }

        public SqlConnection CreateConnection() => new SqlConnection(_connectionString);
        public bool Enabled { get; private set; };
    }
}

// Then use the enabled in your code:

using Dapper;
using Microsoft.Data.SqlClient;

namespace MyCode
{
    public class MyRepository
    {
        ...
        ...

        public async Task<IEnumerable<MyData>> GetAll()
        {
            if (!_sourceDataContext.Enabled)
                return Enumerable.Empty<MyData>();
            using var connection = _sourceDataContext.CreateConnection();
            mydata = await connection.QueryAsync<MyData>($"SELECT * from {_sourceDataContext.TableName1}");
            return mydata;
        }
    }
}
So what do you do if you have an array of objects?
You have to convert the array into a DataTable, then call SqlBulkCopy.
First of all, this is my table:
CREATE TABLE [dbo].[Favorites](
    [rowId] [int] IDENTITY(1,1) NOT NULL,
    [userKey] [int] NOT NULL,
    [favoriteId] [nvarchar](255) NULL,
    [lastModified] [datetime] NULL,
    [isDeleted] [bit] NULL,
    [created] [datetime] NULL,
 CONSTRAINT [PK_Favorites] PRIMARY KEY CLUSTERED
(
    [rowID] ASC
)WITH (PAD_INDEX = OFF, STATISTICS_NORECOMPUTE = OFF, IGNORE_DUP_KEY = OFF, ALLOW_ROW_LOCKS = ON, ALLOW_PAGE_LOCKS = ON) ON [PRIMARY]
) ON [PRIMARY]
GO
I have mapped the table into a DTO. Please notice that names AND THE ORDER of the fields in the DTO matches the names order of the fields in the SQL table:
public class FavoriteDTO
{
    public int RowId { get; set; }
    public int UserKey { get; set; }
    public string FavoriteId { get; set; }
    public DateTime? LastModified { get; set; }
    public bool? IsDeleted { get; set; }
    public DateTime? Created { get; set; }
}
This extension method lets you convert an array of objects into a DataTable. DataTables are used for SQL inserts.
This solution is not mine, in fact it has been copied so many times that I don’t know who came up with it in the first place.
STEP 1: DEFINE YOUR CLASS
The class must represent the SQL table, INCLUDING THE SORT ORDER OF THE DATABASE FIELDS. If the sort order is not correct, you will not be able to use the DataTable for SQL inserts.
This is just an example of a class. Yours will look different.
public class FavoriteDTO
{
public int RowId { get; set; }
public int UserKey { get; set; }
public string FavoriteId { get; set; }
public DateTime? LastModified { get; set; }
public bool? IsDeleted { get; set; }
public DateTime? Created { get; set; }
}
STEP 2: IMPLEMENT THIS EXTENSION METHOD
using System.ComponentModel;
using System.Data;

namespace MyCode
{
  public static class IEnumerableExtensions
  {
    public static DataTable ToDataTable<T>(this IEnumerable<T> data)
    {
      PropertyDescriptorCollection properties = TypeDescriptor.GetProperties(typeof(T));
      DataTable table = new DataTable();
      foreach (PropertyDescriptor prop in properties)
      {
        table.Columns.Add(prop.Name, Nullable.GetUnderlyingType(prop.PropertyType) ?? prop.PropertyType);
      }
      foreach (T item in data)
      {
        DataRow row = table.NewRow();
        foreach (PropertyDescriptor prop in properties)
          row[prop.Name] = prop.GetValue(item) ?? DBNull.Value;
        table.Rows.Add(row);
      }
      return table;
    }
  }
}
There are many articles describing how to make a retry policy when using Dapper. I especially like this extension method implementation. But you cannot inject any class into extension methods because extension methods reside in a static class. Therefore you don’t have a constructor where the injection can happen.
Instead, another easy solution is to create a base class for your Dapper repository classes.
Then you need a reference to a class called “SqlServerTransientExceptionDetector“. You can either grab the code and paste in into your class, or you can reference Microsoft.EntityFrameworkCore.SqlServer NuGet:
Being a base class, we suddenly have a constructor where the injection can happen. Also, the Polly retry policy can be defined in the constructor where the ILogger is available.
STEP 3: HOW TO USE THE BASE CLASS
using System.Data.SqlClient;
using Dapper;
using Microsoft.Extensions.Logging;
namespace MyCode
{
public class MyRepository : DapperRetryPolicyBaseClass<MyRepository>
{
private readonly ILogger<JsonEventRepository> _logger;
public JsonEventRepository(ILogger<MyRepository> logger) : base(logger)
{
_logger = logger;
}
public async Task Execute(string someDateToBeInsertedIntoATable)
{
using var sqlConnection = new SqlConnection("some-connection-string");
await base.ExecuteWithRetryAsync(sqlConnection, "insert into some_table (field) values (@field)",
new
{
Field = someDateToBeInsertedIntoATable,
}
);
}
}
}
Inherit from DapperRetryPolicyBaseClass and define the class type, and the ILogger of the base class will have the same type as the MyRepository.
Then use the base retry methods. On any retry, the base class will log the retry using the ILogger.
That’s it. You are now a Dapper expert. Happy coding.
UPDATE 2023-12-08: Please note that Z.Dapper.Plus is a licensed product and you must pay to use it. For a solution without licensing, check out this article: C# SqlBulkCopy insert a list of objects
Once you have this package, bulk inserts are at your fingertips. Async is supported in a rather special way. Lets see how it’s done.
First of all, this is my table:
CREATE TABLE [dbo].[Favorites](
[rowId] [int] IDENTITY(1,1) NOT NULL,
[userKey] [int] NOT NULL,
[favoriteId] [nvarchar](255) NULL,
[lastModified] [datetime] NULL,
[isDeleted] [bit] NULL,
[created] [datetime] NULL,
CONSTRAINT [PK_Favorites] PRIMARY KEY CLUSTERED
(
[rowID] ASC
)WITH (PAD_INDEX = OFF, STATISTICS_NORECOMPUTE = OFF, IGNORE_DUP_KEY = OFF, ALLOW_ROW_LOCKS = ON, ALLOW_PAGE_LOCKS = ON) ON [PRIMARY]
) ON [PRIMARY]
GO
Dapper is an O/R mapper, so you’ll need a model class that represents the SQL table. The model class does not need to have the same name as the SQL table, but the fields need to be the same:
public class FavoriteDTO
{
    public int RowId { get; set; }
    public int UserKey { get; set; }
    public string FavoriteId { get; set; }
    public DateTime? LastModified { get; set; }
    public bool? IsDeleted { get; set; }
    public DateTime? Created { get; set; }
}
Now all you have to do is to create a repository with a bulk insert method:
using Dapper;
using Z.Dapper.Plus;
using Microsoft.Data.SqlClient;
using System.Data;

namespace MyCode
{
  public class FavoritesRepository
  {
    public FavoritesRepository()
    {
    }

    public async Task BulkInsertAsync(IEnumerable<FavoriteDTO> favorites)
    {
      using var connection = new SqlConnection("your-sql-connection-string");
      // Specifying that the "FavoriteDTO" model class should be bulk inserted
      // into the "Favorites" SQL table
      DapperPlusManager.Entity<FavoriteDTO>().Table("Favorites");
      // Do the actual bulk insert
      await connection.BulkActionAsync(x => x.BulkInsert<FavoriteDTO>(favorites));
    }
  }
}
That’s it. You are now a Dapper expert. Happy coding.
I had this problem when inserting numbers into a SQL database using Dapper. All of my numbers did not round correctly when being inserted, even when using Math.Round() before doing the insert.
My class is something like this:
public class Product
{
    public int ID { get; set; }
    public float Price { get; set; }
    public float VolumePrice { get; set; }
    public float VolumeQuantity { get; set; }
}
And before I did the SQL insert, I made sure that the price was rounded to 2 digits:
// Pseudocode, imagine that you have a
// source item and you update the SQL
// destination item
var product = new Product();
product.ID = souce.ID;
product.Price = Math.Round(source.Price, 2);
product.VolumePrice = Math.Round(source.VolumePrice, 2);
product.VolumeQuantity = Math.Round(source.VolumeQuantity, 2);
But even with the Math.Round(), the SQL database inserts this:
Invalid rounded numbers when inserting floats
It turns out, that inserting the data type float will cause the rounding issue. When I changed the data type to double, the issue went away:
public class Product
{
    public int ID { get; set; }
    public double Price { get; set; }
    public double VolumePrice { get; set; }
    public double VolumeQuantity { get; set; }
}
With the double data type, the rounding is accepted:
Using double as datatype, and dapper will recognize the rounding
In other words: do not use float as datatype. Use double.
Sitecore have been hosting NuGet packages on MyGet for a long time. But Sitecore have decided to move the package storage elsewhere. The move should have been executed November 2023, but because of MyGet service have been unstable, the decision have been accelerated.
This means that you need to update your build environment:

![Calling code marked with [Obsolete] will give a warning.](https://briancaos.files.wordpress.com/2024/04/obsolete.png)
![[Obsolete("", true)] will return an error](https://briancaos.files.wordpress.com/2024/04/obsolete2.png)